
One of the many things I wanted to purchase for our apartment were stools for our kitchen island! We love to entertain, and I wanted our guests to be able to sit down and enjoy their drink while we prepped in the kitchen! I also knew that stools would be great extra seating for our living room. With that in mind, I spent months trying to find a set of stools that I liked and that didn’t break the bank. Sadly, my search came up empty. Everything was either too expensive or too cheap quality, so it was onto the next idea – a DIY project to refinish a set of stools!
I started to think of what kind of stools I could refinish, and came across these counter-height saddle seat stools for only $45! I bought the natural wood stools since they were solid wood (as opposed to MDF), and I could sand off the varnish and refinish them how I wanted to! Thankfully, I also had leftover supplies from my desk and bookcases (check out that blog post on DIY tips before you tackle a big project if you haven’t yet!), so I didn’t have to buy anything extra!
As usual, the project took a wee bit longer than I’d originally expected. 😛 All in all, it was a few hours each day for about five days, or over two weekends. Between the sanding, which you really can’t do all in one day (it’s just too much) and the drying time between coats of stain and varnish, the hours add up! So it’s definitely not a quick project, but I am THRILLED with how they turned out!

If you’re not a DIY expert just yet, this is a pretty straightforward project that you can take on yourself! With a little patience and time on your hands, you can refinish a set of stools for your own home! 🙂 And these tips easily apply to any other wood furniture that you want to make your own! Here is a list of materials that I used for the project, and then the steps involved from start to finish.
Materials:
- Sand paper (in various grits – 60, 100, 220, 320)
- Electric sander (you can rent one at any tool shop)
- Wood conditioner
- Wood stain (I used the colour Provincial)
- White wash pickling stain
- Polycrylic protective finish
- Felt pads (optional)
1. Sand away
I recommend sanding outside or in a workshop with proper ventilation, as there is A LOT of dust! If you do attempt to do your sanding inside, it’s going to be a nightmare to clean up afterwards. I used an electric sander with a rough sandpaper (60 to 100 grit). To sand all the little pieces of the three stools, it took me about 5 or 6 hours. And I finished the sanding off with a 220 grit sand paper to prep the stools for staining. So be prepared, and just don’t even attempt to sand your furniture by hand! I’ve also read about using chemicals to strip the wood, but I don’t love the idea of exposing myself to such harsh chemicals. So I went old school and sanded away! When you are sanding, make sure to really sand them well since you don’t want to be left with any varnish. The stain won’t absorb well (if at all) and then it’ll be a big mess since you’ll have already started staining!
2. Assemble parts of the stools
I assembled the bottoms that I knew I was going to stain white, since it’s easier to stain the stools partially assembled than in individual pieces. I left the seat separate though since that was going to be stained brown.
3. Lay out a drop cloth
You don’t want to get stain on your floors, so be sure to prep the space properly! I stained my stools in my living room and lay down a big canvas drop cloth. With how small the stools are, I found the smell of the stain wasn’t too overpowering (at least it was nothing compared to when we stained our bookcases!). I would still open a window or balcony door to get some airflow though, as that helps. Also, if you have animals (like my black dog Charlie…), do a good vacuum of your space! Even with that, I was still picking out the occasional black hair from the wet stain. 😛
4. Apply the wood conditioner
Wood conditioner helps condition the wood before staining so that your colour goes on evenly. Be sure to read the specific conditioner’s instructions on the container, but basically you apply it with a brush, wait about 5-10 minutes, and then wipe off any extra. From there, you have to apply the stain or white wash within two hours after you apply the conditioner. If you miss that window, don’t worry, you can just re-condition the wood.
5. Apply the stain and white wash
Again, do read the specific instructions on the containers. Similar to the wood conditioner though, the idea is to brush on your stain/white wash, wait a few minutes, and then wipe off with a cloth. I recommend testing this on a spare piece of wood (if possible), or on the underside of a stool where no one will see. When you’re staining, be careful with drips, because they can dry quickly and then it’s pretty tough to remove! For the seats, I propped them up seats on cans for easier access. I stained the underside first, flipped them, stained the top and sides, and then let them dry.
7. Apply the polycrylic protective finish
This last coat is easy – you just brush it on and let dry. Watch for drips though! It’s next to impossible to sand off drips after they’ve dried. And with all the nooks and crannies that stools have, it’s easy to miss corners. So just do thin layers and be careful. Lastly, do a very light sanding to smooth the varnish in between coats, with an ultra fine 320 grit sandpaper.
8. Finish the assembly!
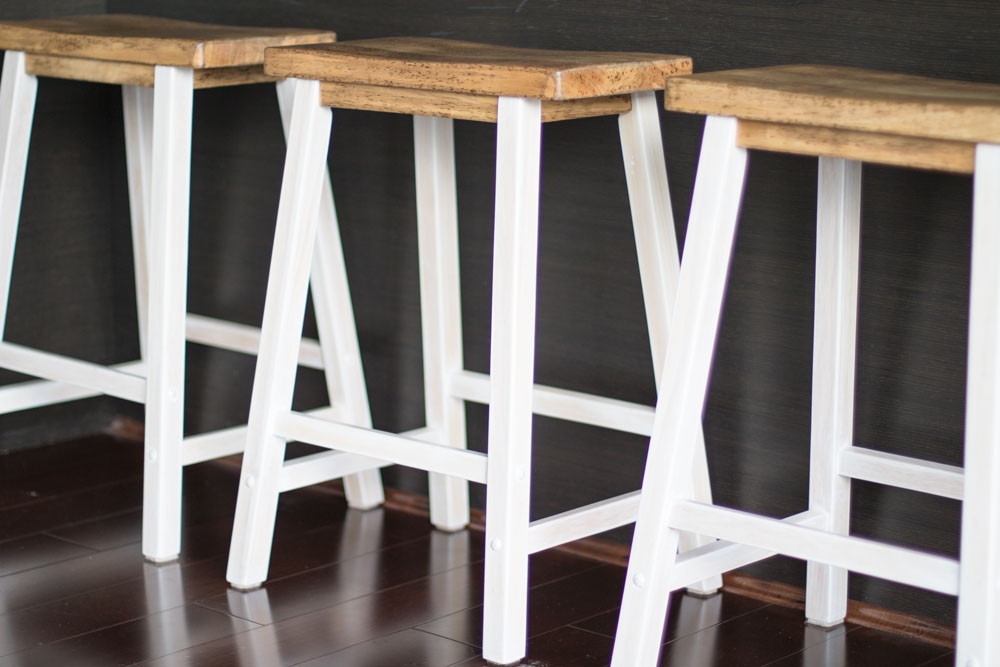
Your final step is to attach the seat to the base, and your stools are complete! Since we have hardwood floors, I added felt pads to the bottoms of the stool legs so they glide smoothly and don’t scratch. But that’s totally optional!
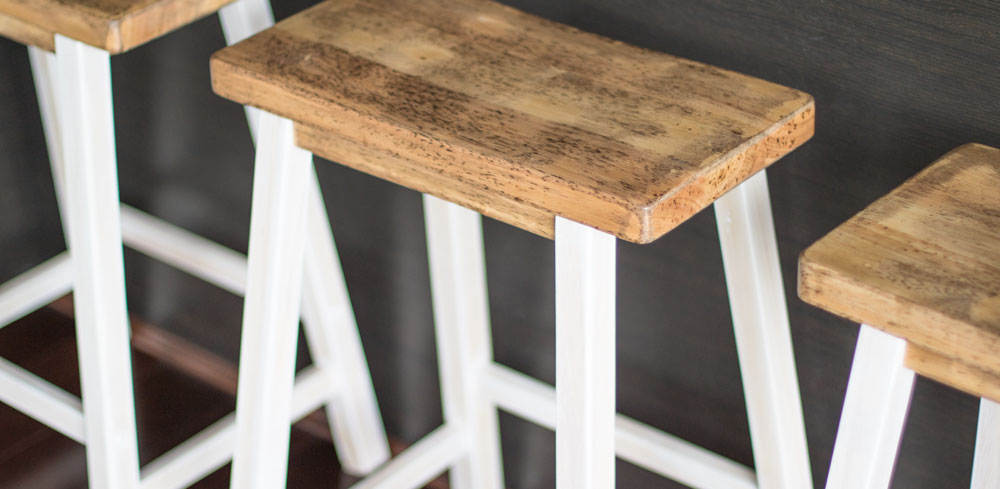
And that’s it – I was able to refinish my own set of kitchen stools! I am so happy with how they turned out! The stools work perfectly with the decor of our apartment and look great at our kitchen island! While it’s definitely not an “afternoon” kind of DIY project, if you can’t find what you’re looking for, or are trying to save a bit of money (and by chance have some of the supplies already), this is a great way to go!
Have you refinished any furniture or done a similar DIY project? How was your experience? 🙂
XO
Danielle