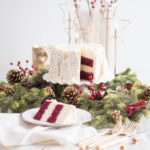
Red Velvet Cheesecake
This red velvet cheesecake is the perfect holiday dessert, and it’s always a HUGE hit with family and friends. It’s absolutely delicious with the light and fluffy red velvet cake layers, sandwiched between two smooth and creamy cheesecake layers. And it’s all wrapped in a velvety cream cheese icing!
Ingredients
Red Velvet Cake
- 1/4 cup unsalted butter (softened)
- 3/4 cup sugar
- 1 egg
- 2.5 tbsp unsweetened cocoa powder
- 3 tbsp red food colouring
- 1/2 tsp vanilla
- 1/2 cup buttermilk
- 1 cup flour
- 1/2 tsp baking soda
- 1/2 tsp salt
- 1/2 tbsp lemon juice
Cheesecake
- 16 oz cream cheese (softened)
- 2/3 cup sugar
- 2 eggs (room temp)
- 1/3 cup heavy cream
- 1 pod vanilla bean
Cream Cheese Frosting
- 3/4 cup butter (softened)
- 6 oz cream cheese (softened)
- 3 1/3 cup powdered sugar
- 1 pod vanilla bean
Instructions
Red Velvet Cake
-
Preheat oven to 350 F. Butter two 6” cake pans. Line the bottom with parchment paper (Tip: trace the bottom of the pan, and then cut slightly smaller than your traced circle). Butter the parchment, and flour the pans.
-
Using an electric mixer, on medium-high speed, cream the butter and sugar until light and fluffy, about 3 minutes.
-
Add the eggs one at a time, beating well after each addition, and scraping down the bowl as needed.
-
In a separate small bowl, using a fork or small whisk, stir together the cocoa powder, vanilla extract and red food coloring to make a thick paste.
-
Add the paste to the batter and mix on low speed (to prevent splattering), then turn it up to medium speed until combined. Scrape down the sides/bottom of the bowl to be sure the batter is evenly colored.
-
Reduce the mixer speed to low and gradually add the buttermilk and flour in two additions, alternating between them and ending with the flour. Beat on high until combined.
-
Again, reduce the mixer speed to low and add the salt, baking soda and lemon juice. Beat on high for another minute until completely combined.
-
Divide the batter evenly between the two cake pans and bake for about 25 minutes, or until a skewer inserted into the center comes out clean.
-
Cool for 10 minutes, then remove cakes from the pans and place them top-down on a cooling rack to cool completely. This helps to flatten the cakes slightly so you don’t have to cut as much off when you’re leveling the cakes.
Cheesecake
-
Preheat oven to 350 degrees F. Butter a 6-inch springform pan and tightly wrap the outside with aluminum foil. I double or triple wrap the pan to prevent water leaking in – usually some water still leaks in, but nothing major. Put a pot of water or a kettle on to boil.
-
Using an electric mixer, beat together the cream cheese and sugar at medium speed until smooth (about 3 minutes).
-
Add the eggs one at a time, beating well after each addition. Scrape down the bowl as needed.
-
With the mixer on low speed, add the heavy cream and vanilla beans, and beat until combined.
-
Pour the batter into the springform pan, and place the springform pan into a larger pan, such as a roasting pan. Pour the boiling water into the larger pan until the water comes about halfway up the side of the springform pan.
-
Bake until the cheesecake until the edges are set but the middle still jiggles a little, about 45 to 55 minutes. Turn the oven off, but leave the cheesecake in the oven with the door closed for 1 hour.
-
Remove the cheesecake from the water bath, take the aluminum foil off the pan, and place it on a cooling rack to cool to room temperature.
-
Place the cheesecake in the refrigerator for at least 4 hours or overnight.
Cream Cheese Frosting
-
Using an electric mixer with the whisk attachment, whip the butter and cream cheese on high for about 5 minutes, scraping down the bowl as needed.
-
Reduce the speed to low and slowly add the powdered sugar until the frosting is smooth and free of any clumps.
-
Add the vanilla bean and mix to combine.
-
Increase the speed to medium-high and whip for a few minutes until the frosting is light and fluffy, scraping down the bowl as needed.
Assembling The Cheesecake
-
Level the tops of the red velvet cakes with a serrated knife.
-
Slice the cheesecake in half horizontally to create two layers. I score the outside of the cheesecake with my knife so I have a line to follow. I slide one knife in half of the way, and another under the other half of the cake, and use both knives to lift the layer of cheesecake.
-
Spread a thin layer of frosting onto your serving plate (as glue), and place a layer of the red velvet cake on top.
-
Stack the remaining cheesecake, red velvet, and cheesecake layers.
-
Once you have your layers stacked, frost the cake with a very thin layer of frosting, to serve as a crumb coat.
-
Place the cake into the fridge for 10-15 minutes to solidify the icing.
-
Frost the entire cake with a generous layer of cream cheese frosting.
-
Now the fun part – decorate your cake! I used a piping bag fitted with a star tip and piped around the base and edges of the cake, but you can have fun here and decorate however you’d like!
Recipe Notes
Refrigerate the cake until about 20 minutes before you’re ready to serve. You can refrigerate any leftovers for a few days, up to a week (trust me though, it won’t last that long!).